 Apprenticeships
 Construction
 Education Tech
 Engineering
 Franchise Networks
 Legal Firms
 Logistics
 MATs
MATs Recruitment
 Retail
 Seasonal Staff
FrogLMS Community
Sites - Rules
In this section. we are going to look at some of the more advanced features available when creating sites in FrogLMS.
Sharing allows you to determine access to overall site, but Rules allow you to hide specific pages and widgets to only be visible to specific groups, or on set dates or even devices.
Presentation Mode takes this further and hides the site's menu, so that users are forced to move through a site using the Next and Back buttons.
While Frog is designed to make assembling and sharing resources as easy as possible for the learner, there are Advanced Page features which make it possible to add additional backgrounds, set if they appear in the menu.


Rules: Rules Overview
There may be times when you wish to hide part of a site for some users, such as with a lesson resource, you might have questions displaying on the whiteboard for students, but the answers only show for teachers.
Using Rules, you can do just that.
In the editing panel, for both Widget tab and in the Page tab, there is second tab, called Rules.
Using the options in here I can hide or show the page or widget and then add a Rule to show it to another group, or with a date check or if the user is logged in.
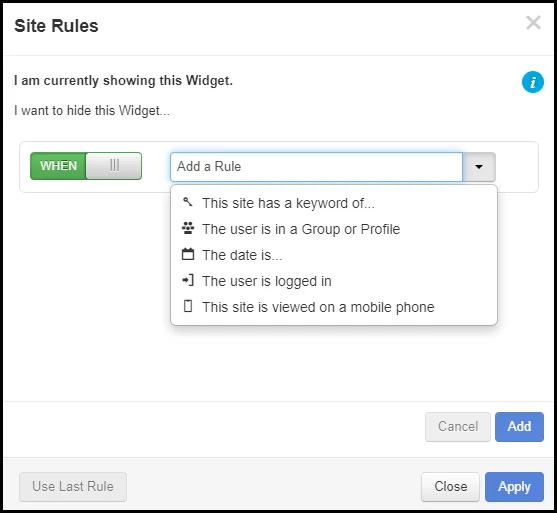
In this example site, I’m going to hide this widget, so only staff can see it.
- I’ll set the toggle to be I want to Hide this widget
- Then I’ll click Add Rule
- Now, I can construct a rule using the dropdown, so I want to Show this widget When the user is in a group or profile.
- Now I search for the group or profile, in this case Staff.
- I’ll also add Admins too • And then I click Add
- Now I can add a second condition, such as date, or I can leave it at this point, by clicking Apply
The Rule will be applied when I leave the editor.
Rules
Rules
Logic Statement
This area spells out in simple english what the rule being applied will do. Sometimes it is helpful to simply read this out loud.
When / Unless toggle
This switch is the next step in the Rule logic. It can be set as When or Unless.
Add a Rule
- Keyword option - Site's can have keywords applied and there is a Set Keyword widget, which allows the user to add or remove keywords from a site. This is especially useful with ePortfolios - where each individual has their own copy of a site. This rule option can be used to add or hide features based on particular keywords.
- Group or Profile - Classes, Year groups, departments, job roles and login types (profiles) can all be used to specify what is visible to them. Currently you cannot set Rules for individuals, although you can use the Groups & Policies application to create groups with only one person in them.
- Date - Using this option, you can have pages or widgets appear only on specific dates or between or from specified dates. This is often used for Options forms, workshop sign ups etc...
- Logged In - If your site is Public on the Web, you can include features for users who have access the site after they have logged into Frog. An example of this may be a gallery on your school website, you might include the Site Timeline with its upload button for staff to add pictures, but then use an Image Carousel to display the photos to the general public.
- Mobile Rule - This options enables you to design an entirely different interface for people viewing you site on mobile phones.
Add Rule
When you are happy with your statement, make sure to click Add. The Rule becomes a statement. There is an edit option should you wish to change it.
Use Last Rule
This feature is handy if you are using rules on lots of widgets and all need the same logic applied. It can speed up site building for you.
Apply
When you're happy, click Apply to save your Rule to the page or widget.
Rules: Presentation Mode
In the Site Sharing video we discussed how you can share an entire site, but there may be times when you wish to hide part of a site for some users. Using Rules, you can do just that.
In the editing panel, for both Widget tab and in the Page tab, there is second tab, called Rules.
Using the options in here I can hide or show the page or widget and then add a Rule to show it to another group, or with a date check or if the user is logged in.
In this example site, I’m going to hide this widget, so only staff can see it.
- I’ll set the toggle to be I want to Hide this widget
- Then I’ll click Add Rule
- Now, I can construct a rule using the dropdown, so I want to Show this widget When the user is in a group or profile.
- Now I search for the group or profile, in this case Staff.
- I’ll also add Admins too
- And then I click Add
- Now I can add a second condition, such as date, or I can leave it at this point, by clicking Apply
The Rule will be applied when I leave the editor.
The same process works for pages and I can use the X button on the Rule when editing to remove the rule.
Rules: Site Menu
There are several additional options for sites in the Site menu in the Frogbar.
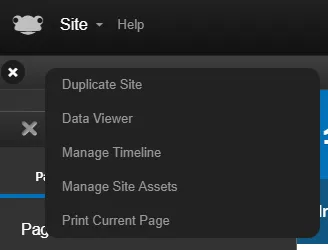
Site Menu
Site
Clicking here will open the menu
Duplicate Site
Depending on the permissions set for individuals, it is possible to duplicate a site directly from here. This will create a copy of the site.
Data Viewer
Data from any forms, polls or quizzes attached to a site will appear here. There is also a Data Viewer widget in the Advanced category so you can embed this on a page.
Manage Timeline
Any images or files sent to a site when not in Editing mode will appear in the Site's timeline. You can delete and download files from here. This can also be embedded on a page using the Site Timeline widget.
Manage Site Assets
Any files uploaded to a site will appear here. Site's retain their own copies of files and the Site Assets can become quite large. There are options within here to delete and clear out the unused site assets.
Print Current Page
Due to the nature of FrogLearn, it is not possible to use the browser's print page function directly. Print Current Page sends the correct page and layout to the browser ready to print.
Rules: Advanced Page Options
Advanced Page Options
At some point, you’ll probably want to have more flexibility than we’ve shown you in basic page editing.
For instance, while you can set a different background image for each page, rather than having the same image on all of them.
In the Page tab in the Settings panel, you can do just that and quite a bit more.
To change the background image for a page:
- Scroll down the Tab to the Toggle for Set Page Background
- Click it
- A new section appears allowing you to upload a background image.
- To undo this, simply click the Set Page Background toggle again.
You can go further than just the background though, you can change the entire theme in the same fashion.
If your page is on the top-level of the menu structure in your site, you are also presented with a direct link. You may need to save your site first, to see this link, but using this link you can direct users directly to this site and this page.
You might want to create a page, but not make it visible yet, or want to create your own site menu using the Text widget. If so, we have added the option to Hide page from menu. This means it and any subpages will not display in the site when viewing the site.
The pages will reappear when editing that site. The final option here is the Delete Page button. Be careful with this option. You can only undo deleting a page by not saving your changes when you close the editor. If you close the editor and save your changes, the page is gone forever. And of course, if you don’t save changes, any other edits you made will be lost.